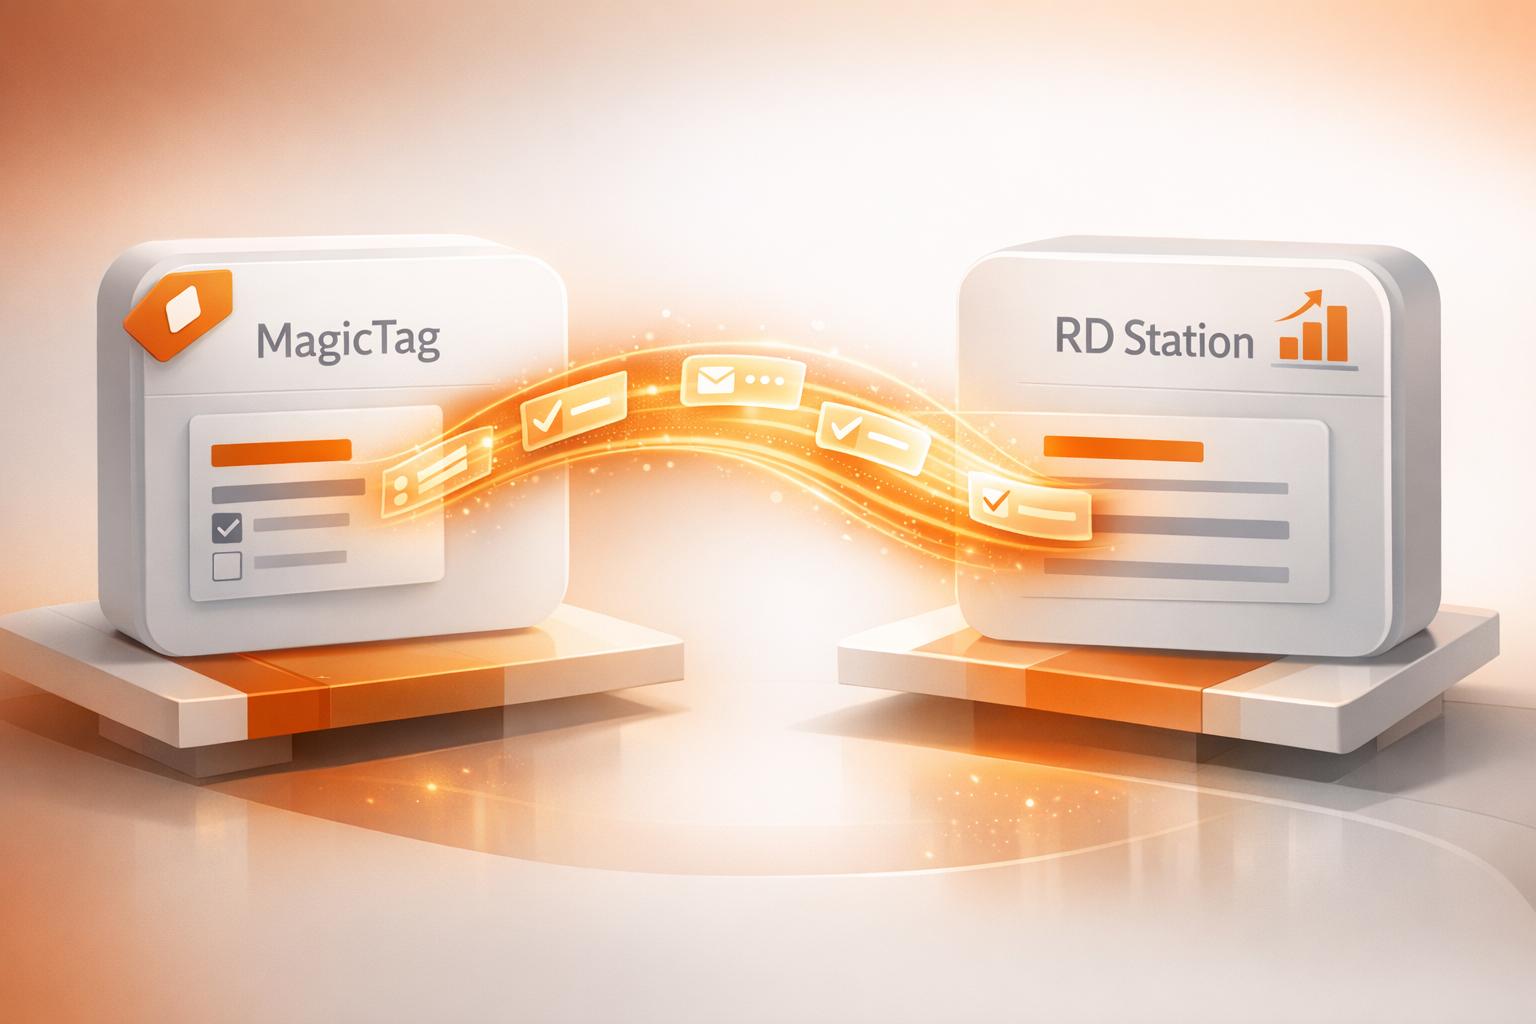
MagicTag and ActiveCampaign make a powerful duo for recovering leads from abandoned forms. MagicTag collects user data in real-time, even if forms aren't submitted, while ActiveCampaign automates follow-ups and organizes contacts. Together, they help businesses re-engage potential customers and improve conversion rates.
Key Highlights:
- MagicTag: Tracks form entries as users type, capturing names, emails, and phone numbers without requiring submission.
- ActiveCampaign: Automates email marketing and CRM workflows, turning captured data into actionable follow-ups.
- Integration Benefits: Automatically tags leads, segments audiences, and triggers tailored recovery emails, saving time and boosting sales.
Getting Started:
- Add MagicTag's code to your website.
- Connect MagicTag to ActiveCampaign using API credentials.
- Set up custom fields, tags, and segments for precise data mapping.
- Test the setup to ensure smooth data flow and automation.
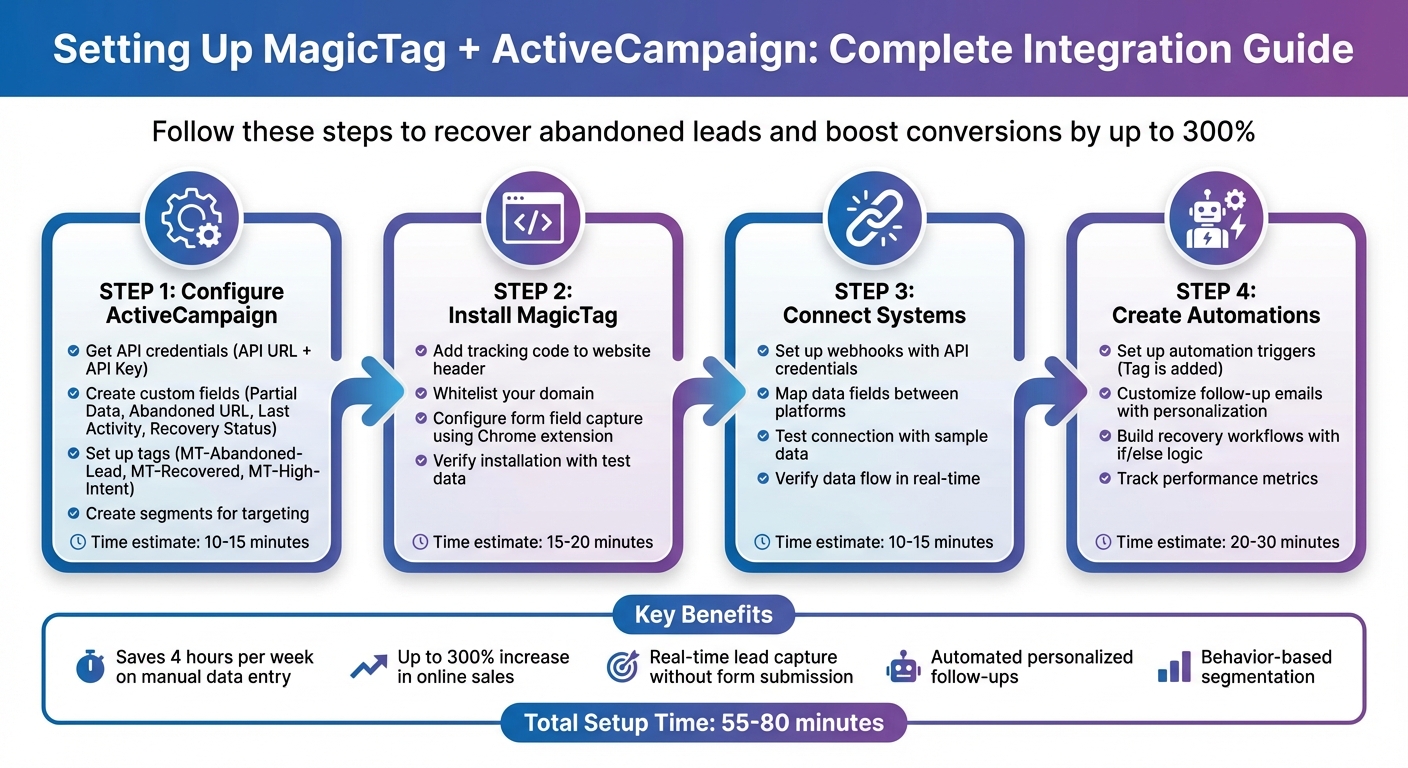
This integration is simple to implement and can significantly enhance lead recovery efforts, with businesses reporting up to 300% increases in online sales by leveraging these tools effectively.
MagicTag ActiveCampaign Integration Setup Process
How To Deliver A Lead Magnet With ActiveCampaign [Full Tutorial]
Setting Up ActiveCampaign for MagicTag
To ensure MagicTag can send captured lead data to ActiveCampaign, you'll need to configure a few settings in your ActiveCampaign account. This setup typically takes about 10–15 minutes and ensures that all data MagicTag collects - from partial form entries to page URLs - integrates smoothly into your CRM.
Getting Your API Credentials
The API URL and API Key are essential for connecting MagicTag to ActiveCampaign.
To locate these credentials, go to your ActiveCampaign dashboard, click the Settings gear icon, and select Developer. Here, you'll find both your API URL and API Key. Copy these values to use during MagicTag's connection setup.
"The API URL and Key can be considered your username and password, which third-party apps can use to access your ActiveCampaign account." - ActiveCampaign Help Center
For best results, use credentials from an admin account or create a dedicated "integration user" account. If you use a regular staff member's credentials and that employee leaves, deleting their account will disrupt the MagicTag connection. If you suspect your API Key has been compromised, you can reset it in the Developer Settings. Just remember to update MagicTag with the new key immediately.
Adding Custom Fields
To capture more detailed data, you'll need to create custom fields in ActiveCampaign. These fields allow MagicTag to store unique data points beyond standard contact information, such as partial form entries, timestamps, and abandoned page URLs.
Go to Contacts > Manage Fields and create the following custom fields:
| Field Name | Field Type | Purpose |
|---|---|---|
| MagicTag Partial Data | Text Area | Stores unsubmitted form input |
| MagicTag Abandoned URL | Text | Records the page where the lead left |
| MagicTag Last Activity | Datetime | Tracks the most recent interaction timestamp |
| Recovery Status | Dropdown | Categorizes lead as "Pending", "Recovered", or "Lost" |
These fields ensure precise data mapping from MagicTag into ActiveCampaign. For instance, the datetime field helps you track when a form was abandoned, enabling timely follow-ups.
Creating Tags and Segments
Tags and segments are essential for organizing the contacts MagicTag sends to ActiveCampaign. Tags act as labels for your contacts, while segments dynamically group contacts based on specific conditions.
To create tags, go to Contacts > Tags and use a consistent naming system. For example:
MT-Abandoned-Leadfor contacts who left forms incompleteMT-Recoveredfor those who returned and convertedMT-High-Intentfor leads who abandoned high-value pages like pricing or checkout
Avoid using special characters like > < [ ] ? \ ^ / + in tag names, as these can cause issues. Stick to simple, descriptive names with hyphens or underscores.
For segments, navigate to Contacts > Segments and set up condition-based groups. For example, you can create a segment for "High-Priority Abandoned Leads" with conditions like: Tag is MT-Abandoned-Lead AND Custom Field 'MagicTag Abandoned URL' contains /checkout. This allows you to focus on valuable abandoned leads and target them with precise recovery campaigns.
Installing MagicTag on Your Website
Adding the MagicTag Code
To get started, log in to your MagicTag dashboard and head over to the Website/Connect section. Here, you’ll find your unique tracking script. Before using it, make sure to whitelist your website domain - this step is crucial for authorizing data collection. Once that’s done, copy the script and paste it into your website's header, just before the closing </head> tag.
For WordPress users, you can easily add the code using a plugin like Insert Headers and Footers or by editing the header.php file of your theme. If you’re on platforms like Shopify or Wix, locate the custom code section in your theme settings and paste the snippet there.
With the tracking code in place, you’re ready to configure the form fields you want to track.
Configuring Form Field Capture
Next, open the form you want to track - this could be a contact form, newsletter signup, or even a checkout page. Using the MagicTag Chrome extension, you can label form fields like "Email Address", "Name", or "Phone Number" directly from your browser. This tool makes field mapping straightforward: just click on each input field and assign a label. Be sure to match these labels with the corresponding custom fields in ActiveCampaign.
Once all fields are mapped, double-check your settings to ensure everything is aligned for smooth data capture.
Verifying the Installation
Before launching any recovery campaigns, it’s important to test your setup. Open your website form and enter some test data, but don’t hit submit. Head over to your MagicTag dashboard and check the real-time activity feed to see if the partial data appears.
To confirm the connection with ActiveCampaign, type // in an empty contact field to verify that your custom labels are displaying correctly. If everything looks good, complete a full test submission on your form. Then, check ActiveCampaign to ensure a new contact record has been created with all the captured details - this includes partial entries, the abandoned URL, and a timestamp. Lastly, review ActiveCampaign’s Reports to confirm that real-time engagement data is being logged properly.
Connecting MagicTag to ActiveCampaign
Setting Up Webhooks
Webhooks allow MagicTag to send data to ActiveCampaign instantly whenever someone interacts with your form. This removes the need for manual data entry and ensures that every lead - even those from partially completed forms - makes its way into your CRM.
To get started, grab your API Key and API URL from ActiveCampaign (refer to earlier instructions). Then, navigate to your MagicTag dashboard and find the Integrations or Webhooks section. Paste your ActiveCampaign API credentials into the appropriate fields. When setting up the webhook, choose the specific events you want to track, such as subscribe (when a new contact is added) or update (when contact details are modified).
"Webhooks provide the ability to receive real-time data updates about your various ActiveCampaign events." - ActiveCampaign Developer Documentation
For security, ensure you're using HTTPS and incorporate secret tokens to protect the data being transmitted. Stick to subscribing only to critical events to avoid data clutter. For example, if lead recovery is your focus, prioritize form submission triggers over broader updates like contact edits.
Once the webhook is configured, the next step is mapping the incoming data to the correct ActiveCampaign fields.
Mapping Data Fields
After setting up your webhook, the next task is to align MagicTag's field labels with ActiveCampaign's fields. This step ensures that when someone fills out "John Smith" in your form, the data accurately populates the "First Name" and "Last Name" fields in ActiveCampaign, rather than ending up in unrelated or custom fields.
Start by reviewing the field labels you created in MagicTag using the Chrome extension. These might include labels like "Email Address", "Name", or "Phone Number." Then, log into ActiveCampaign and navigate to Settings > Fields to confirm that matching fields exist. Standard fields like Contact Name, Email, and Company are typically easy to map. For custom data - like "Preferred Contact Time" or "Product Interest" - you’ll need to create corresponding custom fields in ActiveCampaign before mapping them in MagicTag.
Pay close attention to field types. For example, email fields in MagicTag must map to email fields in ActiveCampaign, and phone numbers should map to phone fields. Mismatches can cause sync errors, leading to incomplete or inaccurate contact records.
Once all fields are mapped correctly, you’re ready to test the connection.
Testing the Connection
Testing the connection ensures everything is working as it should. Use sample data to test your form - try submitting with a test email like "test@yourdomain.com."
Next, log into ActiveCampaign and go to Contacts. Search for the test email address and verify that a new contact record has been created. Check that all the mapped fields, such as name, email, phone number, and any custom fields, are populated correctly. If you’ve set up tagging for segmentation, confirm that the appropriate tags are applied. Additionally, if you’ve linked automation triggers (like a welcome email), make sure those are functioning as expected.
If the data isn’t appearing, double-check your API credentials in ActiveCampaign under Settings > Developer to ensure the API Key and URL are correct. Make sure the "Email" field is always included, as missing mandatory fields is a common reason for submission failures. Remember, ActiveCampaign webhooks guarantee "at least once delivery", but they won’t retry if the initial attempt fails. Thorough testing now can save you from troubleshooting later on.
sbb-itb-77d5bc3
Creating Lead Recovery Automations
Once you've connected MagicTag and ActiveCampaign, you can transform abandoned forms into recovered leads using automated, personalized follow-ups. By utilizing the tags and custom fields you've already set up, you're ready to build effective recovery workflows that capitalize on this integration.
Setting Up Automation Triggers
The simplest way to kick off a recovery automation is by using the "Tag is added" trigger. For instance, when MagicTag applies a tag like "Abandoned Form" to a contact who didn’t complete your form, ActiveCampaign can automatically launch the workflow.
Here’s how to set it up:
- Open the Automation Builder in ActiveCampaign.
- Select "Tag is added" as the start trigger.
- Enter the exact tag name that MagicTag applies (e.g., "Abandoned Form").
- Under Trigger Frequency, choose "Runs Multiple Times" if you want contacts to re-enter the automation every time they abandon a form.
If you're on the Plus, Professional, or Enterprise plans, you can also use the "Contact field changes" trigger. This works well if MagicTag updates a custom field like "Lead Status" to "Abandoned." However, the tag-based trigger is simpler and works across all plans, including Starter.
| Trigger Type | Plan Availability | Best Use Case for MagicTag |
|---|---|---|
| Tag is added | All Plans | Starting recovery when an "Abandoned Form" tag is applied |
| Contact field changes | Plus, Pro, Ent | Starting recovery when a custom status field is updated |
| Submits a form | All Plans | Identifying leads who completed a form |
Important: Automation triggers in ActiveCampaign are not retroactive. If someone abandoned a form before you activated the automation, they won’t automatically enter the workflow. You’ll need to manually add those contacts if you want to include them. Also, remember to set an existing automation to "Inactive" before making edits so the updates apply correctly.
Customizing Follow-Up Emails
Once your triggers are in place, the next step is crafting personalized follow-up emails. Generic emails rarely get results, so leverage the data MagicTag collects - like the contact's name, email, or partially completed form details - to make your messages relevant and engaging.
Use personalization tags to tailor your emails. For example:
- Address recipients by name using
%FIRSTNAME%. - Reference specific details like
%PRODUCT_INTEREST%or%PREFERRED_CONTACT_TIME%if MagicTag captured them.
To ensure your emails look polished, apply formatting modifiers. For instance:
%FIRSTNAME|TITLECASE%ensures names appear as "John" instead of "JOHN" or "john."- UPPERFIRST and LOWER are other handy options for capitalizing or formatting text.
Personalization pays off. In 2024, about 50% of U.S. shoppers made online purchases after receiving personalized recommendations from brands. Take the example of Hipcooks, a company with seven cooking schools. They tracked contacts' locations and interests to send city-specific event details and seasonal recipes. This targeted approach boosted customer retention by 70% and significantly cut marketing costs.
"Personalization is just being able to put a message squarely in one of those sectors." - Brennan Dunn, Founder, RightMessage
To make your emails even more relatable, use a real team member's name in the "from" field and include a friendly, conversational sign-off.
Building Recovery Workflows
A strong recovery workflow guides contacts from "Abandoned" to "Recovered" status using a mix of wait conditions, if/else logic, and tag updates.
Start by adding a "Wait" action after the initial trigger. This gives the contact time to complete the form on their own before sending a recovery email. For example, you might wait 1 hour or pause until a specific condition is met, like form submission or purchase completion. Always set a maximum wait period (e.g., 24 hours or 7 days) to ensure contacts don’t get stuck in limbo.
Next, introduce if/else conditions to tailor the workflow based on the contact’s actions. For instance:
- After sending the first recovery email, check if the contact opened it or clicked a link.
- If they engaged, send a second, more targeted follow-up.
- If they didn’t, wait another day and try a different message or approach.
As contacts move through the workflow, update their status with tag actions. For example:
- Remove the "Abandoned Form" tag and replace it with "Recovered Lead" when someone completes the form.
- This keeps your records organized and helps you track recovery rates.
Instead of creating one large workflow, consider breaking it into smaller, focused automations. For example:
- One automation for the initial recovery email.
- Another for follow-ups.
- A third for long-term nurturing.
This modular approach makes troubleshooting and optimizing individual steps easier.
To avoid overwhelming your audience, limit follow-ups to 2–3 attempts. If a contact doesn’t respond after a few tries, move them to a different segment or pause outreach entirely. This ensures you maintain good deliverability rates and avoid spam complaints.
Tracking and Improving Performance
Once your recovery workflows are up and running, it’s time to measure how well they’re working and pinpoint where leads might be dropping off. Tools like ActiveCampaign's reporting features and MagicTag's dashboard give you a clear view of how leads move through your system and where they might exit.
Metrics to Track
To evaluate the success of your workflows, focus on key metrics like automation completion, email engagement (open rates, click-through rates, unsubscribes, and bounces), site visits, and conversion rates. These indicators help you directly connect MagicTag activities to your overall business goals. Site tracking is especially helpful - it lets you see which pages, such as pricing or checkout, your recovered leads visit. This data can then be used to trigger more tailored follow-up actions.
Keep an eye on engagement tags like "Engaged", "Recent Activity", "Disengaged", and "Inactive" to track how leads progress through the customer lifecycle.
| Metric Category | Key Indicator | Purpose |
|---|---|---|
| Engagement | Open & Click Rates | Gauges initial interest and message effectiveness |
| Workflow | Completion Rate | Monitors how many leads finish the recovery automation |
| Productivity | Hours Saved | Measures efficiency gains from MagicTag’s automation |
| Business Impact | Conversion Rate | Tracks the percentage of recovered leads that make a purchase |
| Lead Quality | Contact/Lead Score | Assesses the engagement level of individual recovered leads |
With these metrics in hand, you can analyze trends and uncover actionable insights to refine your approach.
Reviewing Your Data
Dive into the data from MagicTag and ActiveCampaign to spot performance gaps. Adjust elements like wait times or messaging as needed to improve results. ActiveCampaign's Active Intelligence can simplify this process by allowing you to ask natural-language questions like, "Which automations are driving the most conversions?" - saving you from manual data analysis.
Take a closer look at contact-level insights to trace the journey of individual leads. This includes their site activity and email interactions. If you notice that leads tagged as "Disengaged" or "Inactive" are consistently dropping off, consider setting up a win-back workflow or sending out feedback surveys to re-engage them - or, if necessary, clean up your list.
"Reports only matter if they change what you do next. Use what you see to make one small improvement, ship, and measure again." - ActiveCampaign
Use these insights to tweak and improve your workflows for better performance.
Making Improvements
Based on what you’ve learned, fine-tune your lead recovery workflows to achieve stronger results. For example, if open rates are low, experiment with new subject lines. If click-through rates are high but conversions are lagging, focus on optimizing your landing pages. Also, double-check your field mapping to ensure personalization is accurate.
Leverage if/else branching to refine your audience segments and adjust automation timing to better align with user behavior. Enable reply tracking on the email summary page to gather data on direct responses, especially for workflows targeting high-intent leads. Additionally, use site tracking to create intent-based segments. For instance, you can target users who visited the pricing page but didn’t complete a purchase with highly specific recovery messages.
Conclusion
Integrating MagicTag with ActiveCampaign gives you the tools to recapture leads that might otherwise slip through the cracks. By syncing real-time form data directly to your CRM, you eliminate the hassle of manual data entry and ensure every lead gets a personalized follow-up. On average, this integration can save your team about 4 hours each week, freeing up time to focus on closing deals.
One of its standout features is the ability to trigger behavior-based automations. For example, you can identify leads revisiting your pricing page and automatically send them targeted emails.
"Tags are the sticky-labels of ActiveCampaign... they're hands down the easiest and fastest way to organize contacts".
This kind of dynamic segmentation ensures your messages land with the right audience at the perfect time.
"ActiveCampaign's strength lies in its depth of automation capabilities. Whether you're a small business needing basic campaigns or an enterprise requiring complex funnel journeys, it scales elegantly." - Add to CRM
FAQs
How does MagicTag collect data from incomplete form submissions?
MagicTag leverages cutting-edge tracking technology to gather user data entered into forms - even if the form isn’t submitted. This means you won’t lose important lead information, giving you the chance to reconnect with potential customers. By syncing effortlessly with ActiveCampaign, MagicTag allows you to streamline your data integration, craft tailored follow-ups, and improve your lead recovery efforts.
What advantages does integrating MagicTag with ActiveCampaign offer?
Integrating MagicTag with ActiveCampaign makes managing leads a breeze by syncing form submissions directly into ActiveCampaign’s contact database - no coding or complicated setup needed. This seamless, real-time connection ensures that tags, notes, and tasks are instantly updated. That means leads can be segmented, added to lists, and funneled into automated workflows without missing a beat.
With this automated data flow, you can set up personalized follow-up sequences triggered by specific MagicTag events, like when a new tag is added or a contact is created. Plus, it brings all lead activity together in one place, giving you a complete picture of each prospect while cutting out tedious manual data entry. The payoff? Quicker responses, fewer mistakes, and a smoother sales process that helps you close more deals.
How do I connect MagicTag with ActiveCampaign?
To link MagicTag with ActiveCampaign, head to the Integrations section in your MagicTag dashboard and choose ActiveCampaign. Next, log in to your ActiveCampaign account, go to Settings → Developer, and grab your API URL and API Key. Enter these details in MagicTag to create a secure connection.
After the connection is established, match your MagicTag form fields (like email and name) to the corresponding fields and tags in ActiveCampaign. To ensure everything is set up correctly, submit a lead through a MagicTag form and check that the contact appears in ActiveCampaign with the right data and tags. If it all checks out, your integration is ready to handle automated workflows. Make it a habit to occasionally review MagicTag for any potential errors to keep things running smoothly.