MagicTag and WebEngage combine to help businesses recover lost leads and boost conversions. MagicTag captures user data in real time as they fill out forms, even if they don’t submit them. This information is instantly sent to WebEngage, which automates personalized follow-ups through email, SMS, WhatsApp, and more. Together, they enable businesses to re-engage users and turn incomplete interactions into revenue without manual effort.
Key Highlights:
- MagicTag: Logs user details as they type into forms, even if abandoned.
- WebEngage: Automates multi-channel follow-ups using the captured data.
- Results: Up to 12x more leads captured and a 39% increase in conversions.
- Use Cases: Recover abandoned carts, understand why visitors abandon forms, and boost customer engagement.
- Setup: Easy integration via webhooks or APIs; privacy-compliant.
This integration is ideal for businesses looking to recover lost opportunities and grow revenue using automated workflows.
Setting Up MagicTag
Installing MagicTag on Your Website
You can set up MagicTag quickly, even without technical expertise. The simplest way for non-technical users is to use Google Tag Manager (GTM). GTM provides an easy-to-use interface, so you don’t have to deal with website code.
Start by logging into your dashboard and navigating to Data Platform > Integrations > SDK (Configure) > Website. Here, register your website by entering its domain name. You’ll also find your unique License Code in the Account Setup section - keep this handy.
In GTM, create a new tag and choose Custom HTML as the tag type. Copy the JavaScript integration snippet from your dashboard and paste it into the HTML field. Replace _YOUR_LICENSE_CODE_ in the snippet webengage.init("_YOUR_LICENSE_CODE_"); with your actual license code. Next, go to the Triggering section and select All Pages to ensure the tag runs site-wide. Save your tag and publish the GTM container.
If you’re not using GTM, you can manually add the integration code. Just place the script right before the closing </body> tag on your website. The script loads asynchronously, so it won’t slow down your page, and it automatically adjusts to your site’s protocol.
To confirm the installation, check the real-time dashboard. It should start capturing data from form interactions instantly. Once verified, you can configure the dashboard to monitor and manage the data being collected.
Setting Up the Real-Time Dashboard
Once MagicTag is installed, your dashboard will automatically track system events and user attributes like browser type, operating system, country, and device model. To go further and capture specific real-time form data, you’ll need to define custom user attributes (e.g., email, name) and custom events (e.g., "added to cart").
Before integrating any code, double-check your dashboard URL to determine your data center. If the URL reads dashboard.in.webengage.com, you’re using the India data center. If it’s dashboard.webengage.com, you’re on the Global (US) data center. Using the wrong SDK snippet for your data center will stop data from appearing in your dashboard.
After integrating the code, test it by performing simple actions on your site - fill out a form, move to the next field, and navigate away. Wait a few minutes and check the real-time dashboard to see if the data appears. Keep in mind, web sessions automatically end after 30 minutes of inactivity. When naming custom events or attributes, avoid starting names with "we_" to prevent conflicts with system events.
Finally, ensure you review your GDPR/LGPD compliance settings to align with data privacy regulations.
Meeting GDPR/LGPD Requirements
MagicTag is built to help you comply with data privacy regulations. It supports the Right to Erasure, allowing you to delete personal data linked to identifiers like email, mobile number, or ID using specific APIs. When a user requests data deletion, the initial process completes within seven days, while full removal from logs and backups may take up to 60 days.
The platform also provides SDK methods to let users opt out of data tracking. Once triggered, these methods stop tracking events, though anonymous lifecycle events (like "Site Opened") may still be recorded to maintain basic analytics functionality. Additionally, you can track user consent for communication channels using predefined attributes such as we_push_opt_in, we_sms_opt_in, and we_email_opt_in.
It’s crucial to inform users about how their data will be used and to obtain explicit consent before sending any marketing communications. If a user doesn’t give consent during signup, you can use SDK methods to block push notifications and in-app messages on their device. Even when personal data is erased, aggregated anonymous data - like campaign performance statistics - remains available for analytics purposes, ensuring no individual data is linked.
Connecting MagicTag with WebEngage
How to Set Up MagicTag with WebEngage Integration
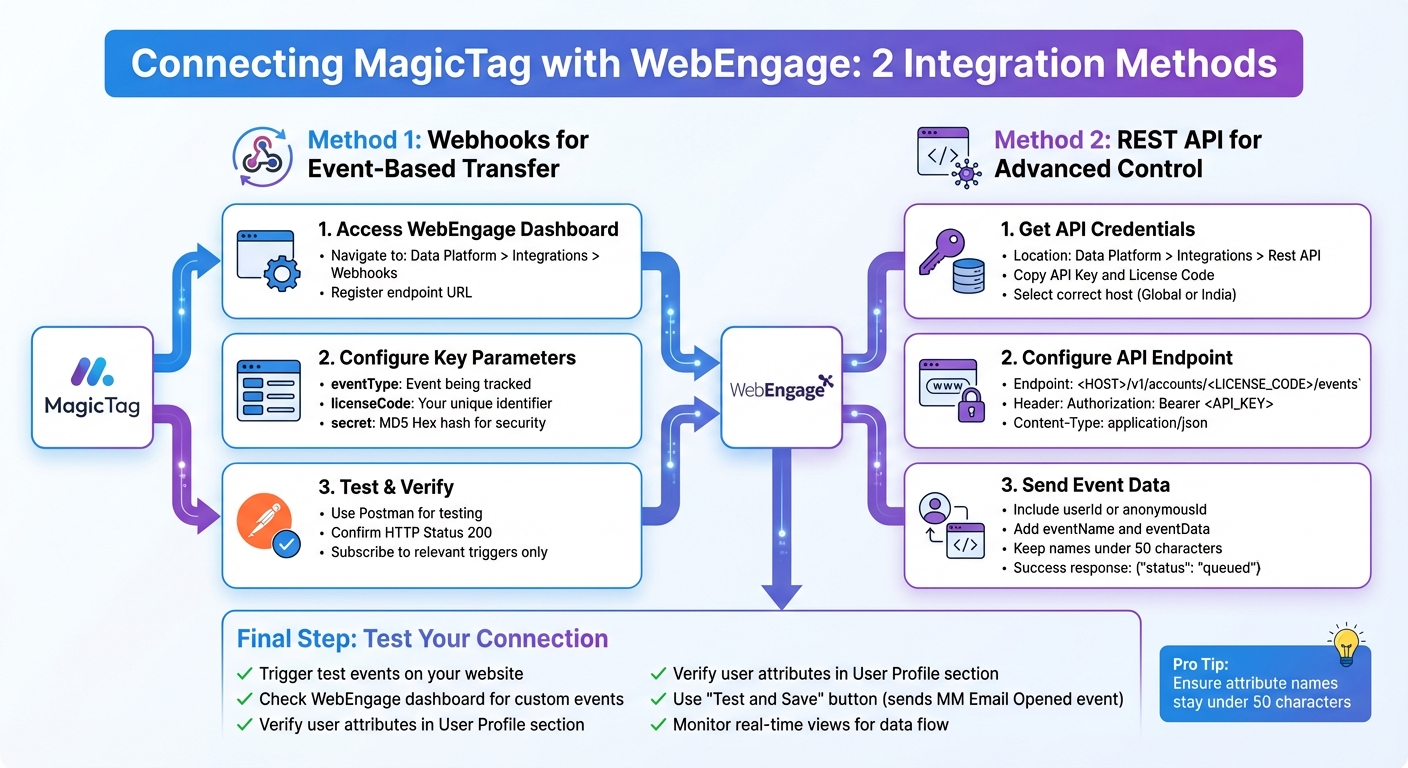
After installing MagicTag, the next step is to connect it with WebEngage for recover abandoned form leads and remarketing. MagicTag’s ability to capture data in real time pairs seamlessly with WebEngage through two main methods: webhooks for event-based data transfers and the REST API for more advanced customization. Here's how to set up each method to ensure smooth data synchronization.
Setting Up Webhooks for Data Transfer
Webhooks are essentially HTTP callbacks that send a POST request to a specified URL whenever a specific event occurs. For example, when MagicTag captures a lead, such as a user entering their email in a form, WebEngage can immediately receive and process that data.
To set up webhooks:
- Log into your WebEngage dashboard.
- Navigate to Data Platform > Integrations > Webhooks.
- Register the endpoint URL where data should be sent.
Each webhook request uses the POST method and includes key parameters like:
eventType: Specifies the event being tracked (e.g.,FEEDBACK_SUBMITor custom events).licenseCode: Your unique WebEngage account identifier.secret: A security parameter created as an MD5 Hex hash of your WebEngage license code and a Secret Key, separated by a colon (:).
The secret parameter is crucial for ensuring the data originates from WebEngage. Always verify it on the receiving end. Additionally, WebEngage includes an x-request-id header - a unique identifier for each POST request. This helps prevent duplicate processing, a concept referred to as idempotency.
To avoid unnecessary data, subscribe only to relevant event triggers. For lead recovery, focus on events like LEAD_CAPTURED or FORM_ABANDONED. Before going live, test your webhook setup using tools like Postman to confirm your endpoint processes JSON payloads correctly.
| Parameter | Description |
|---|---|
eventType |
The specific event being tracked (e.g., Feedback, Survey, or custom events). |
licenseCode |
Your unique WebEngage account license code. |
secret |
A key used to verify that the POST request is from WebEngage. |
Using the API for Advanced Features
Although webhooks push data automatically, the WebEngage REST API offers more control over what data is sent and when. This is particularly useful for syncing custom attributes from MagicTag, such as lead source, form ID, or product preferences, directly into WebEngage user profiles.
To use the REST API, follow these steps:
- Include your API Key in the request header as
Authorization: Bearer <YOUR_API_KEY>. - Locate your License Code and API Key in the WebEngage dashboard under Data Platform > Integrations > Rest API.
- Use the appropriate API host:
- For the global dashboard:
https://api.webengage.com/ - For the Indian data center:
https://api.in.webengage.com/
- For the global dashboard:
The primary endpoint for tracking events is <HOST>/v1/accounts/<YOUR_WEBENGAGE_LICENSE_CODE>/events. Each API call must include:
userIdfor identified users oranonymousIdfor unknown users.eventNameto specify the event.- Relevant
eventDatacaptured by MagicTag, such as email, phone number, or cart value.
Set the Content-Type header to application/json. Keep custom event names and attribute names under 50 characters, and avoid starting them with the reserved prefix we_. A successful API call will return a response like {"response": {"status": "queued"}}.
Important Note: The first data point synced determines an attribute’s data type (e.g., String, Number, Boolean). Ensure consistency in subsequent calls to avoid interruptions. While JSON Object attributes can’t be used for user segmentation, they work well for personalizing campaigns.
Testing the Connection
Once webhooks and API settings are configured, testing ensures everything works as expected. Start by manually triggering events - fill out a form, click a tracked button, or move to the next field on your site. MagicTag should capture this data and relay it to WebEngage in real time.
In the WebEngage dashboard:
- Confirm that custom events appear with accurate attributes.
- Check the User Profile section to verify that system attributes (like email or phone) and custom attributes sent via MagicTag are mapped correctly.
- For webhooks, monitor the response status. WebEngage considers an
HTTP Status 200a successful post, while other statuses are logged as failures.
For API testing, use Postman to send a sample POST request to the WebEngage Event API, verifying your license code and API keys. In March 2025, Mailmodo introduced a standardized testing protocol for its WebEngage integration. Users can click a "Test and Save" button within the integration interface, which sends a sample event named "MM Email Opened" with a test email (hello@mailmodo.com) to the WebEngage dashboard. This allows immediate verification of the connection in the "Events" section.
Before launching live workflows, test automated follow-ups with a small group of internal users (e.g., teammates) to ensure everything functions correctly. Use WebEngage’s "Live Segment" or "Real-time" views to monitor events as they occur, which helps identify any delays or issues. During testing, ensure attribute names stay under 50 characters and string values under 1,000 characters to avoid truncation.
Once the connection is verified, you’re ready to use WebEngage to create tailored lead recovery workflows.
Lead Recovery Strategies
MagicTag works seamlessly to log key form data in real time, giving WebEngage the ability to kick off automated follow-ups instantly. With this setup, WebEngage transforms abandoned interactions into conversions by employing recovery workflows across multiple channels.
Recovering Incomplete Form Submissions
It’s common for potential leads to drop off while filling out forms. MagicTag steps in by capturing data as users type - such as email addresses or phone numbers - even if they don’t finish the form. This data is then used by WebEngage to create a lead profile through its SDK or Google Tag Manager integration. From there, WebEngage’s automated "Journeys" launch personalized recovery workflows that respond to specific abandonment triggers. If email doesn’t work to re-engage the lead, the system automatically switches to SMS or Web Push notifications to keep the conversation going.
A great example of this in action is DODuae.com, a UAE-based e-commerce platform. In June 2018, the company used WebEngage Journeys to address cart and form abandonment. Marketing Manager Kamran Khursheed implemented a strategy that sent automated reminders to users who left their carts or wishlists unfinished. The result? A 14.77% recovery rate for abandoned carts and a noticeable boost in checkout conversions.
"I'd been looking for a product which could help us automate our marketing operations. It became possible when we collaborated with WebEngage."
- Kamran Khursheed, Marketing Manager, DODuae.com
Exit-intent notifications also play a key role, offering users a final incentive when they’re about to leave. Adding a personal touch - like region-specific or seasonal content - makes these messages even more effective. With support for up to 25 custom user attributes and 25 event attributes (across String, Boolean, and Number data types), WebEngage provides plenty of flexibility to tailor recovery efforts.
This proactive data capture lays the groundwork for swift and efficient follow-ups.
Automating Follow-Up for Abandoned Leads
Manually following up with abandoned leads is time-consuming and inefficient. WebEngage eliminates this problem by triggering automated follow-ups based on real-time events like cart abandonment or changes in user behavior. These workflows ensure that leads are re-engaged without requiring manual effort. For instance, using a condition like "Is User Reachable" helps verify activity on a particular channel before sending notifications.
Here’s how it works: if a user abandons a cart or form, you can wait two hours to check if they’ve completed the action. If not, a push notification is sent. If the user doesn’t respond to the push, the system follows up with an email. By incorporating "wait" nodes - set to minutes, hours, or even days - you allow leads time to respond before sending the next message. Plus, by analyzing browsing history or partial form entries, you can include relevant product recommendations or category-specific content in your follow-ups.
Adding incentives, like a 15% limited-time discount, can further entice users to complete their actions. WebEngage also supports lead scoring, assigning positive points for actions like email clicks and negative points for inactivity. These scores help prioritize "hot" leads for immediate attention by the sales team. It’s no surprise that 80% of marketers reported increased leads with automation, and 76% of companies saw a return on investment within the first year. Automation also saves up to 80% of time and resources on repetitive tasks.
But recovery doesn’t stop at automation - segmenting leads ensures your outreach is even more effective.
Segmenting Leads for Targeted Outreach
Segmentation takes automated follow-ups to the next level by personalizing outreach based on real-time data. WebEngage’s "Live Segments" allow you to group users based on factors like location, behavior (actions taken or not taken), and technology (device, browser, or operating system). For example, you can focus on users who added items to their cart but didn’t complete the purchase, making it easier to target high-intent leads.
You can refine your approach further by evaluating "Reachability" to prioritize channels where users are most active - whether that’s push notifications, email, SMS, WhatsApp, or web push. Using "AND/OR" logic, you can combine multiple criteria, like targeting users in a specific city who also have a high loyalty point balance. Behavioral segments based on recency (e.g., users who haven’t purchased in two weeks) also help trigger timely re-engagement campaigns.
For example, in November 2025, insurance provider ACKO used WebEngage’s omnichannel automation to segment and target users for policy renewals. This strategy achieved a 93% reach and boosted renewals by 20%. Similarly, in October 2025, EdTech platform Testbook used segmentation and gamification to revamp in-app messages, leading to a sixfold increase in conversions compared to earlier approaches.
Campaign tagging is another way to sharpen your outreach. By categorizing campaigns (e.g., "New User Activation" or "Cart Abandonment"), you can align your efforts with specific audience needs. Data like custom user attributes or product interests enables hyper-personalization, giving you a deeper understanding of the customer journey and allowing for highly tailored product recommendations.
sbb-itb-77d5bc3
Practical Ways to Increase Conversions
Once you've set up segmentation and automated follow-ups, the next step is to refine your strategies to recover abandoned interactions. The key is identifying workflows that genuinely drive conversions and keeping a close eye on their impact.
Cart Abandonment Recovery Workflows
Cart abandonment is a common hurdle - 98% of first-time website visitors leave without completing a purchase. Tools like MagicTag can help by capturing user data as they add items to their cart, even if they don't finish checking out. This data integrates seamlessly with WebEngage, allowing you to create multi-channel recovery workflows that go beyond the typical email reminders.
A proven approach involves a three-step engagement process: start with a Web Push notification while the user is still active, follow up with a Mobile Push if they switch devices, and end with an Email if previous attempts fail. For instance, in February 2024, an online education provider used WebEngage's Journey Designer to implement this exact strategy. When users added a course to their cart but didn’t complete the purchase, the system triggered this three-step workflow. This approach stood out from the typical email-only strategies, which dominate 80% of cart abandonment efforts.
To ensure effectiveness, verify whether the user is reachable on each channel before sending messages. Add appropriate wait times between touchpoints to avoid overwhelming them. For high-value carts, you can create urgency by offering a time-sensitive incentive, like a 5% discount.
Automated Remarketing Campaigns
Remarketing works best when triggered by specific user actions, not just preset time intervals. MagicTag tracks key events and activates remarketing workflows immediately when conversions don't occur.
Set up campaigns using Conversion Events, which are specific actions you want users to complete - like finalizing a purchase or submitting a form. Then, create workflows targeting users who started an action (e.g., added items to their cart) but didn’t complete it within a set timeframe. For example, if a user begins filling out a contact form but doesn’t submit it, you could trigger a remarketing sequence two hours later.
WebEngage's Deepest-Latest Attribution model helps pinpoint which touchpoint led to the conversion. It prioritizes clicks over views and views over sends, attributing the conversion to the most recent, meaningful interaction. For instance, if a user viewed your email, clicked a push notification, and then made a purchase, the push notification gets the credit.
Set a Conversion Deadline to track attribution within a specific timeframe. If you're running a "Tuesday Deal" that ends at midnight, you might set a 16-hour deadline to ensure only conversions during the promotion are counted. This prevents skewed data from unrelated purchases made later.
"Automation applied to an EFFICIENT operation will magnify the EFFICIENCY. Automation applied to an INEFFICIENT operation will magnify the INEFFICIENCY." - Bill Gates
Using campaign tags like "Cart Abandonment" or "Lead Recovery" can help you group similar efforts and compare their performance across various objectives. This way, you can easily identify which strategies resonate most with your audience.
Measuring Results with Dashboard Data
Once your campaigns are running, monitoring their performance is essential. Tools like the MagicTag dashboard and WebEngage analytics offer real-time insights into how well your strategies are working. Focus on metrics that directly impact revenue rather than vanity metrics like total message sends.
One key metric is Unique Conversions, which helps you measure the number of customers recovered. Calculate your Unique Conversion Rate by dividing unique conversions by the total number of users engaged. This gives a clear picture of how effective your messaging is.
For revenue tracking, assign monetary values to your conversion events. WebEngage can calculate metrics like Click-through Revenue (from users who clicked before converting), Impression-through Revenue (from users who viewed but didn’t click), and Send-through Revenue (from users who received the message). For example, if in-app messages generate five times the engagement of push notifications but only 2.5 times the revenue, it might be time to rethink your in-app content strategy.
The results speak for themselves. In November 2025, insurance provider ACKO used WebEngage's omnichannel automation to reach 93% of their target audience, boosting policy renewals by 20%. Similarly, Eureka Forbes integrated offline data to automate their Annual Maintenance Contract renewals, achieving 4X revenue growth and cutting operational costs by 2.5X, all while covering 95% of their user base.
For deeper insights, filter your conversion data by specific attributes. For instance, if you run a furniture store, you could track conversions for "Interiors and Decor" separately from other categories. This helps pinpoint which segments respond best to your recovery efforts, ensuring your budget is spent wisely.
"One of the most powerful metrics that help determine the true impact of a campaign is the number of conversions it results in, and the amount of revenue it contributes to your top line." - WebEngage Knowledge Base
MagicTag Pricing Plans
Once you've set up automated lead recovery workflows, the next step is choosing the right MagicTag plan to get the most out of your efforts. Your decision should align with your WebEngage usage and lead recovery goals. The best plan depends on the number of users you aim to identify each month and the level of integration your automation workflows demand. Matching your plan to your WebEngage-driven strategies ensures smooth automation and efficient budget use.
Plan Options and Costs
MagicTag offers four pricing tiers designed to meet various lead recovery needs:
- Free Plan: $0/month for up to 1,000 identified users. Perfect for testing WebEngage webhook connections on smaller websites.
- Starter Plan: $19/month for up to 10,000 identified users. Includes full API access and CRM integrations, making it ideal for more advanced WebEngage Journey Designer triggers.
- Business Plan: $99/month for up to 50,000 identified users. Supports high-volume pipelines, advanced filtering, and SLA-backed support.
- Enterprise Plan: $299/month for businesses managing over 50,000 users monthly. Offers dedicated infrastructure, custom integrations, and premium support.
Each plan includes MagicTag's core feature: real-time user capture, which identifies users as they type - even if they abandon the form. Trusted by over 5,000 websites, MagicTag can recover 12x more leads than standard forms, increasing conversions by 39% when paired with WebEngage.
Plan Comparison
| Feature | Free | Starter | Business | Enterprise |
|---|---|---|---|---|
| Monthly Users | Up to 1,000 | Up to 10,000 | Up to 50,000 | 50,000+ |
| Price (Monthly) | $0 | $19 | $99 | $299 |
| Integrations | Basic Webhook | Full API + CRM | High-volume | Custom |
| Support | Priority | SLA | Premium | |
| Ideal For | Testing/Small Sites | Growing SMBs | High-volume E-comm | Large Enterprises |
How to Choose the Right Plan
To pick the best plan, start by estimating your monthly website traffic and form abandonment rate. You can use a form abandonment analyzer to get precise data on where users drop off. If your identified users are fewer than 1,000, the Free plan is a great way to test the connection. For businesses leveraging complex WebEngage workflows - like "Call an API" or "Set User Attribute" actions - the Starter plan is the minimum requirement, as it provides full API access.
For high-volume e-commerce or lead generation campaigns exceeding 50,000 identified users per month, the Business or Enterprise plans are better suited. These options ensure pipeline reliability and SLA-backed support. With WebEngage serving over 800 customers globally and engaging 350 million users monthly, your MagicTag plan should scale with your operational needs.
Conclusion
By integrating MagicTag with WebEngage, businesses can recover lost leads effortlessly. MagicTag captures contact details as visitors type - before they even submit forms - helping you identify up to 12x more users and boosting conversions by 39%.
"MagicTag has become one of our highest-ROI tools. We now convert visitors who would've vanished forever." – Chris Caveiras, Founder
This integration is designed to be seamless. Using webhooks or APIs, data flows in real-time, allowing for immediate remarketing while leads are still engaged. With WebEngage's Journey Designer, you can automate the process, segment recovered leads through RFM modeling, and send personalized messages that drive conversions.
The results speak for themselves. Businesses have reported conversion improvements ranging from 14.77% to 20% by implementing targeted recovery strategies. These numbers underscore the impact of using real-time data to recover and convert leads.
And here’s the best part: MagicTag offers a free plan that lets you identify up to 1,000 users per month at no cost. It’s a risk-free way to test the integration and turn missed opportunities into revenue with automated, targeted outreach.
FAQs
How does MagicTag collect data from partially completed forms?
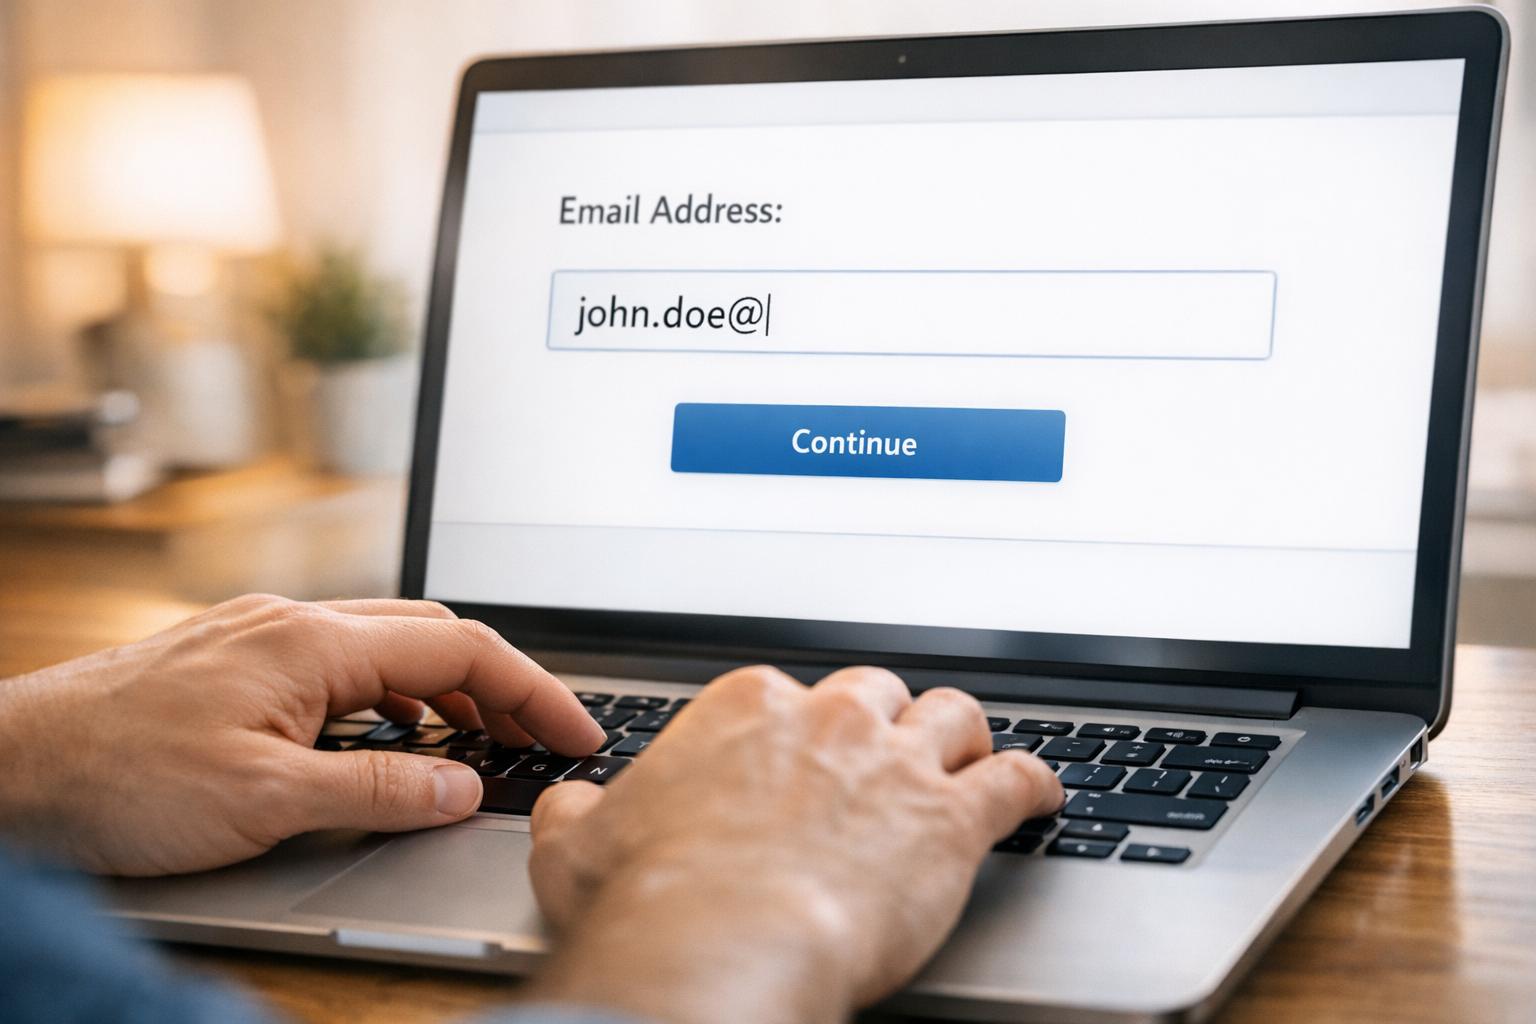
MagicTag works by embedding a lightweight JavaScript snippet that tracks data from partially filled forms in real time. As users type into fields like name, email, or phone number, the script securely captures the input instantly - even if they don’t click the “Submit” button.
This means MagicTag can spot potential leads the moment someone abandons or pauses while filling out a form. The captured data integrates directly with WebEngage, enabling automated recovery workflows without needing extra developer input. This makes it easier to re-engage leads and boost your conversion rates with minimal effort.
What are the advantages of using MagicTag with WebEngage?
Integrating MagicTag with WebEngage simplifies lead recovery by combining MagicTag's visitor identification capabilities with WebEngage's engagement tools. MagicTag can identify up to 12 times more anonymous visitors, turning them into actionable leads and increasing conversion rates by about 39% - all without any technical setup.
After capturing leads, WebEngage takes over with tools for personalized nurturing. It enables marketers to send tailored emails, push notifications, and on-site messages. The integration also automates form recovery by linking incomplete or abandoned submissions to user profiles, reducing manual work and ensuring fewer missed opportunities.
By working together, MagicTag and WebEngage streamline the process of converting anonymous visitors into engaged customers. Marketers gain a unified view of their leads, automated workflows for recovery, and the ability to deliver personalized outreach across multiple channels. The result? Better-quality leads, improved efficiency, and measurable growth for businesses.
How does MagicTag help businesses stay GDPR-compliant?
MagicTag makes it easier for businesses to stay GDPR-compliant with its privacy-by-design features that simplify data protection processes. Here's how you can use it to meet compliance standards:
- Handle "right-to-erasure" requests: MagicTag's GDPR/CCPA API allows you to process these requests seamlessly. Submit a user's identifier (like an email or phone number), and MagicTag will delete their personal data while retaining anonymized metrics for analytics purposes.
- Collect only what's necessary: Configure MagicTag to gather just the data you need for lead recovery. It also stores user consent records automatically with every form submission, ensuring transparency.
- Empower users with control: Offer users a secure endpoint to either request their data or delete it. All stored data should be encrypted, and any reports generated will come from de-identified datasets to maintain privacy.
By integrating these practices, businesses can stay GDPR-compliant while using MagicTag to enhance lead recovery efforts effectively.